Tuesday, February 25, 2014

Dressing room to bedroom

Before we put our house on the market, I knew I had to turn my dressing room back into a bedroom.  There wasn't much to do, I just had to move the bookcases and bench out and find a bed.  Luckily, my mother in law had acquired a charming vintage metal bed for us, and it was a perfect piece for this room!  Here it is with a bad paint job and faux wood contact paper over the adorable metal flower design.  I can't believe I didn't get a shot of the contact paper!  Seriously, it was awful and I scraped at it for a long time.  
I thought about painting it a fun color, but ultimately decided white would be best.  Shaun told me the flower design was ugly and I should paint the entire bed white, but I wanted to keep that detail.  I figured if it looked ugly once painted, I could always paint it later!  
I used two cans of spray primer, and two cans of Rustoleum Universal spray in satin white.  I think the end result is darling!  It is amazing what some fresh white paint can do.
Once I cleaned up the insets, I loved them, and they keep the bed from looking too much like a hospital bed. Which it does, I'm aware.  
The rest of the room turned out great!  I finally hung the yellow clock on the wall, it had been resting on top of the window blinds for the last three years.  
I added this little half-moon table, which was also given to me by my mother in law and painted white years ago.  It works so well under the window, a perfect fit!  An old Ikea desk lamp was a free bedside light, even though I wanted to buy a cuter one.  I was actually pretty impressed with my restraint.  (Since, you know, I get Shaun's employee discount at TJ Maxx!)
I found the sheets, bed skirt, and reversible throw at Target, the pillows and blanket I already had from various places.  The yellow vase was purchased years ago from Crate and Barrel.  I decided to leave the racks on the wall as display rather than take them down and deal with patching all the holes.  I couldn't think of anything creative to use them for, so I hung my colorful skinny belts and a girly purse.  
The other rack holds a robe and some other random items.  Yep, I stole one of Ashford's toys because it matched the room.  
The other side of the room looks exactly the same.  I did paint the windows in this room, which I hadn't done yet.  I was actually shocked at how many doors and windows we hadn't painted in the five years we've lived here.  Awful that you do it all when you are going to be leaving soon!
I still get ready in here every morning, as you can see I didn't remove all my shoes or extra overflow clothes in the closet.  I'm very happy with the way it turned out, and even happier that it only cost me a few cans of spray paint and some bedding that I can use when Ashford is old enough for a twin bed.  
On the home sale front, we have had huge turnouts for our open houses, lots of showings, fabulous comments, and a few very interested buyers, but only one couple that has had a second showing....which was yesterday.  They really like the house and do NOT have a house to sell, which is amazeballs.  We are hoping and praying that this is the couple that puts in our first offer.  Wish us luck!

Saturday, February 8, 2014

The house saga, and an ode to winter

Hello, all!  I just wanted to check in and tell you all what has been happening.  Our house has been on the market for 65 days now, and we recently dropped the price 8k to 197k.  We really feel bad about the price after all the updates we've done, but we are also trying to be realistic about the soft market in Racine.  Homes comparable to ours (although not as beautifully decorated/updated, of course!) are selling in the high 180s - so we are hopeful that dropping below the 200 mark is going to get us a new set of buyers.  Our realtor is pretty confident we will sell in the low 190s, so we're hopeful about that.  We are SO ready to sell, and have had nothing but great comments on the house, in fact we have two sets of buyers that really want our house, but have their own houses to sell.  Isn't that always the way it goes?  
This winter has not been kind to us.  We just get more and more snow, and the sub zero days are awful.  It will warm up and snow, then the ice and snow will melt, then it is below zero and everything is ice.  We don't ever feel like we have a weekend, it is always spent cleaning and shoveling.  Our beautiful patio is definitely not a selling point right now!
The shared driveway is still the number one issue for potential buyers, which is funny, because the shared driveway has saved my life this winter!  Our neighbors are retired, and they take care of every snowfall for me while Shaun is away during the week.  If I didn't have them, there is just no way I could get the snow shoveled and keep track of Ashford.  That kid does love to join the shoveling fun, though!
The winter doesn't always seem as bad when you get to see it through your child's eyes.  
And the snow does make for beautiful photos during the day...
...and at night.  So, there's that.  (I still don't like you, snow)
We have an open house scheduled for tomorrow, and I have a question for you all...should we have Shaun's famous homemade cookies and water bottles available?  Or is that a pointless expense/effort?

Wednesday, January 22, 2014

My new walk in closet

The last time I showed the master closet, it was looking like this:
I had my vision all marked out on the wall with tape, and then I went about ordering all my materials.  The boob light (and the tape) was taken down...
I put up a plain bulb light fixture - ok, it was just hanging by the wires in this photo - painted the trim, and painted the walls with my bedroom color, Behr Aqua Smoke....
Floor trim went in, my DIY crystal chandelier went up, my DIY window treatment went up, I accessorized, hung pretty hooks, and here is the finished product!  

Oooo, I love it!  It actually holds most of the stuff from the dressing room.  There is a lot of hanging and folded clothes storage in this 4x5 space.
It all came together exactly as I thought it would! 
Here are some details from my fabulous little space.  This DIY Faux window shade was so easy!
The chrome rod/shelf supports are from Closetbay.com, I got three for each rod to avoid sagging.  They are shiny and fabulous!  The white laminate shelves are from Menards and Home Depot.  
The small chrome self supports are also from Closetbay, and came two per pack which was a great price!  
The rod and shelf supports come out exactly to the depth of the window trim, so it all worked out perfectly.  I used my signature stained wood closet rods in here, of course!  
My crystal chandelier, which will be shared as a separate post.  It was so worth doing myself instead of buying a fixture!
My favorite crystal hooks from the Home Depot...fun fact, the wall anchors in this wall just kept falling back into the framing because whoever drywalled this room used the thinnest crap drywall ever.  Needless to say, all the shelf supports are in studs!
When I saw this funny postcard I had laying around the house, I knew I had to find a pretty frame to hang it up in this closet.  I hope potential buyers find it funny when they see how my clothes take over just about every closet in our house!
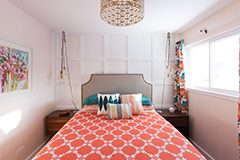
The gorgeous hand loomed cotton rug is from Overstock, I love it.  It is a good complement to the orange Moroccan tile rug in the bedroom, without being too matchy. 
The shoe rack was dug out of storage, and the white storage unit for my sweaters and jeans was a cheapo Room Essentials bookcase from Target.  I also added a little clasp for the original window shutter to keep it closed, it was brass and I sprayed it white. 
The little white cloth bins I found at Shopko for $5 each, what a steal!  I have all my tights and dress socks in those.  
So, that is the new closet.  The incredibly hard to photograph closet.  What do you think?  Is it worthy of taking over the duties of the dressing room?

Thursday, January 16, 2014

We are moving and I'm losing my mind

Our house is on the market. 
Yep, that is why I cannot regularly update this blog to save my life.  We are relocating to Minnesota as soon as our house sells, and in the meantime I'm on my own with Ashford while Shaun is working in MN all week.  A big promotion was too good to pass up, so I am sadly leaving my beloved house and looking for a new dump to restore in a new state!  I'm also going to be unemployed for the first time since I was 14!  Good times.  We did a lot more little projects inside the house, so I'll be sharing those soon. Wish us luck with the sale, please.  The Racine market is the pits. 

Thursday, December 26, 2013

White Christmas

I forced my family out in the cold on Christmas Eve to get some photos before it got too dark.  They aren't exactly creative poses, but I love a snowy backdrop...and it would've been a crime to not capture Ashford's stylish outfit!  
If only I'd thought to move the hose.  I hope you all had a great Christmas!

Monday, December 23, 2013

Take better photos of your kids this Christmas

The other night I found myself feverishly snapping pics of Ashford during a totally abnormal bout of adorable smiling and calm play with the Christmas tree.  These are the kind of photos that make my mommy brain and my photographer brain get drunk together and then die of happiness.  
As I was reviewing these photos, I thought to myself...I want everyone to have photos like this!  So, I thought I'd share some tips with everyone for taking better photos of your kids this Christmas.  

1. Most important.  Use an actual camera, not your phone!  Check your camera manual to see how you can get the best low-light images.  It's worth it.  I have a full frame DSLR that makes it easier to take great shots, and I also shot all the 'white jammie' photos in raw, then used ACR and Photoshop Elements to reduce grain, adjust exposure, white balance, and brighten his face and eyes.  These tricks certainly make for great images, but even a point and shoot can produce prettier photos with some preparation.
2. Turn off your flash!  It is unflattering, creates shadows, and takes all the soft light away from your subject.  It also eliminates the beautiful light halos of your tree lights.  Hold yourself steady, use a tripod, or set the camera on a table to reduce camera shake and blur.  I took these pics with an outdated point and shoot (Canon Powershot SD1200) that is terrible in low light.  I had all the lamps in the room on, and also a three-light floor lamp pointed at the tree.  Flash photo on the left, no flash on the right. 
Obviously, this is a dumb photo of my kid watching TV - but it shows the difference between the flash and no flash rather dramatically.  Which looks nicer to you?  Would you even be able to tell that it was 9am in the flash photo?  I didn't edit any of these, but in the no flash pic I would remove the color cast from his face in Photoshop and do some other tweaks. 
Of course photos without a flash will be softer and grainy, but I don't mind that when the trade off is the pretty tree lights and feeling that you are seeing the scene, not a flash.  This one was taken using my Rebel XSi, and I will definitely be deleting the flash photo, however I love the other one!   I will probably mess around with the white balance though.  
3.  Speaking of white balance, without a flash you will want to compensate for indoor lighting, so your images don't come out all orange.  The proper white balance setting on your camera is most likely 'incandescent' or 'tungsten' unless you use all reveal bulbs or those super-white CFLs.  I find that auto white balance hardly ever gets it right indoors.
  
4. If you have white lights on your tree, face your kiddo towards it to capture the light on their faces.  (If you have colored lights you can still do this, but their face may get the color cast from the lights) 
5. If you want the tree behind them, make sure there is a bright lamp or some lighting on their faces, or your camera will expose for the background and leave their faces dark.  Directional floor lamps are great for this!  Just watch out for overhead lights, which make ugly shadows on faces.  Or, you can have fun with silhouettes against the lit tree. 
6. If you want a blurry tree in the background, bring the subject farther away from the tree to blur the lights.  It's best to have a camera with manual control, so you can open up your aperture and really blur that background.  Here are some 'twinkle light' photos I took of Ash for our Christmas card, and the settings I used to get that beautiful bokeh. All photos were taken with my 28mm f/1.8 lens which is my very favorite lens!    
ISO 200 SS 1/320 f/2 
ISO 320 SS 1/320 f/2 
ISO 640 SS 1/400 f/2.5 
For this setup, I had two continuous lights set up behind me to my left and right, and natural light was coming in from the window directly behind me for the first two, the others were at night.  In this shot of all of us, you can see how the (white cord!) lights were pinned over a white sheet on my backdrop.  You can also see a bit of the bulb to the right.  
And after I got this into photoshop, the result was a fabulous family photo.  Since it was a group shot, I had to close up my aperture a bit to make sure we all stayed in focus, the camera/tripod was quite close to us...so the lights are a little more visible than I'd like. I also could've cloned in more lights, but I was lazy.  Overall, I'm very happy with my first attempt at twinkle light photos!   
ISO 500 SS 1/400 f/3.2 
Another shot of the setup, where you can see I had a large reflector on the bed.  Not sure how much it helped to bounce light, but I'm sure it was better than nothing. 
7. Get down to kid level to get the best composition.  I laid on the ground and used my elbows as a 'tripod' for these!  (You can see from the settings that I really had my ISO cranked, shutter speed slow, and aperture wide open to compensate for it being night time and no flash.)
ISO 8000 SS 1/80 f/2.2 
ISO 6400 SS 1/80 f/1.8
8.  Try creative poses: kids under the tree, peeking from behind, or standing looking at it while you take the photos from below. ISO 6400 SS 1/80 f/2.2
Through the tree is cute, too!  You really need a camera that allows you to choose your focus point.  If I'd used my powershot on this one, it would've most definitely focused on the ornament, or my hand, rather than his eye.   
ISO 6400 SS 1/80 f/2.2
Even if you are using a flash, try to take photos that are different and unique to make it interesting.  If you need some inspiration, try this blog: 
Clickin Moms
I joined their forums a few months ago and have learned so much!  The blog is free to peruse and one of their photography instructors has a great post about using a remote or 'interval shooting' (if your camera has that feature) to get yourself in the Christmas photos this year.  Have fun, and please email me if you have any specific questions!  
ISO 6400 SS 1/80 f/1.8
* All white jammie photos were edited using a free Photoshop Elements action called Vanilla Peach by Julia at Night Fate.  I love the soft glowy look it adds to the photos. Check it out here!