Showing posts with label Master Bedroom. Show all posts

Tuesday, January 22, 2019

KonMari-ing our closets

So.  Organization is pretty much on everyone's mind in January, but especially this year with 'Tidying Up' streaming on Netflix.  We watched the first couple episodes, and like many people, it resonated with us in a big way!  Shaun is not one to go through his clothes very often, he had sweaters and jeans in the closet that he hasn't worn in ten years.  That means these clothes were moved to Minnesota and to Illinois without us ever addressing the issue.  He actually got rid of two huge black garbage bags of clothes that didn't "spark joy," but it is much harder for me to get rid of things.  Here's what I was looking at on a daily basis:
Disaster!  There was constantly stuff on the floor, piled on my nightstand, and everywhere else I could throw something.   I realized that the 'bookshelf' solution that worked well for clothing storage in my dressing room years ago was not that effective inside a tiny closet.  Also, please hold while I go cry into my glass of wine and look at photos of my beloved dressing room. 
 I also had this 'bin of shame' that just held a huge pile of stuff that I didn't use often (cough cough *workout clothes*) and was always such an eyesore. 
 Here's a better look at that pile once I removed all the random bags from the floor:
The floor was always like this because things would fall off the bookshelf and I was too lazy to put it back.  Also, slippers.  Such a problem, you damn sippers!
I knew I needed to go through the clothing and KonMari that crap, but I also realized I needed better storage in here.  I decided to go with white mesh Elfa 'dressers' from The Container Store, and it has worked out really well in this small closet!  The best part is that January is their annual Elfa sale, so I got 30% off.  (Spoiler alert, it's still expensive!)
When things are piled on shelves, it usually makes a mess when you try to remove something from the bottom of the stack, so drawers were much better for things like tank tops, t shirts and pants.  Assembling the Elfa stuff wasn't exactly fun, but it was easy enough.  You have to hit the pieces together VERY hard, so be sure to protect your floors really well when putting together.  I opted for the driftwood melamine tops instead of white, clear feet and the clear drawer clips that ensure you can't pull the drawers all the way out onto the floor.  Here is the final product!
This closet is 48 inches wide INSIDE, but the space between the open doors is just 37 inches.  Whatever drawer units I picked had to fit inside that width so I could slide the drawers out without hitting the closet doors.  I ended up choosing the tall (10 runner) narrow (14") frame for the left, and a short (4 runner) wide (22") frame for the right.  Together they are 36 inches wide, perfect for this space. 
Once you pick your frames, you just buy the drawers you want, the top you want, and put it all together.  The units are clipped together in the front and back, so they won't slide around.  I love how much easier it is to get to my things!  I can also push back the teal bin (which holds my bras - ha!) and make enough room for emergency folded clothes that need to be put away if I'm short on time. 
I tried my best to do Marie K's folding technique, but ended up pretty much just rolling everything in the smallest drawers.  I love that everything is one layer deep now, no wondering what I have.  I can also pull the drawer all the way out without it falling, to see the back. 
Some other things I added to increase the functionality are Container Store shelf dividers for the existing wire shelving that came with the house.  I was so happy they fit perfectly!  I need one more for in between the last two stacks of sweaters. 
I also purchased this clear plastic ventilated shelf liner from Container Store, they sell it in 12, 16, and 20 inch depth to fit standard wire shelving.  I had to cut little boxes out to allow the shelf dividers to pass through, but the bonus is that the shelf dividers hold the liner on with no sliding around.  No more snagging my sweaters!
I've had these hooks sitting in my laundry room unused for years, finally got around to installing them in here for jewelry and robe storage.  Thanks, Youngsters! 
I love how these look, and I didn't mess with anchors.  Just drilled a small hole in the drywall and screwed them in.  
A few more little things I added are Elfa hooks behind the hanging clothes to store belts:
 And purses:
I also have a couple handbags on the lower drawer unit top, and it's a great place to store boots and shoes so they aren't on the ground. 
 I also have enough room on the right side to store tall boots, which is nice.
All of my jeans and leggings fit in the short unit, and all my everyday tops and sweaters fit in the closet somewhere.  I got rid of several bags of clothes, so I'm feeling pretty good.  Now, I just need to work on getting rid of my 'overflow' clothes in the other rooms.  That is mostly dressy stuff, and things I am not sure I will ever wear again, but find it hard to get rid of.  I'm especially impressed with Shaun's closet makeover, his side is pretty bare compared to before!
 Our closets are looking so much better. 
What you didn't see, the bed immediately after this project.  Ha! 
A little before and after:
I'm so happy with the functionality of my closet now, I'd highly recommend the Elfa storage line if you are looking for help with closets, cabinets, or any space in your home!  Just to be clear, everything in this post was purchased by me at retail price.  As always, this blog is for fun and I do not accept sponsored posts or free products in exchange for reviews.

Tuesday, March 22, 2016

Our master bedroom

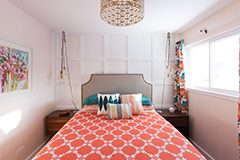
Prepare to be underwhelmed, here is our master bedroom.  Please don't mind the cluttered dresser and random stuff on the ground, it's a miracle I got the room this clean!
This is a very modest room, it measures 13x15 and has nowhere near the square footage or storage of the previous masters we've had.  When it's clean, it's not too bad in here.  Alas, it's never clean.  These photos required 15 minutes of carrying crap to Ashford's room to clear it out. 
We still have a pile of framed art in the corner that we're not sure what to do with.  I don't love the Cycles Gladiator print anymore, but I'm not sure if it's the frame or the print.  I do love the curtains, but the (Behr) Aqua Smoke wall color, curtains and rug together make for very limiting bedding options to avoid being too busy.  I really need to find a nice neutral/solid comforter set.
A new addition is the headboard from Wayfair.  I wanted something lighter than the dark brown one we've had, but I wouldn't recommend this one.  Especially at the current selling price of $500, I paid $300 in December!  It's very thin, was advertised as 'cream' when it's clearly a natural/tan color, and it's not super secure because the holes don't line up with the holes on either of our bed frames.  It may be moving to the guest room so I can get a nicer one for us. 
I'm so tired of our furniture.  I've had this set since I was 22 years old, and I'm dying for something new and less matchy.  But it's in good condition, it's pretty classic in style, and I wouldn't get much if I sold it, so I have to live with it for now.  Did you see the 'Keep Calm and Carry On' poster still up on the wall?  YOU GUYS.  Shaun loves it, and won't hear of not putting it up.  Embarrassment.  I'm sorry.  I should at least get a new frame that isn't dingy like that old Ikea one. 
My very small closet does not have any hope of holding my clothes.  The doors are also on pretty wonky since we got our floors done and had to remove them all.  Luckily, the doors themselves are fine looking and I was able to dress them up a little with some beautiful knobs from Anthropologie. 
I also added a couple nice hooks from Home Depot in between them to help keep stuff off the floor.  I loved that they went well with the dark curtain rods and light fixture. 
The light fixture is from Shades of Light, and it was worth the money in my opinion.  It gives a ton of light, doesn't hang down too far for my bed-jumping kid, and the crystal on the bottom ties in my lamps and hooks. 
So, that is the end.  Not a bad before and after, eh?
As far as budget, we had some whole-house work that happened in this room, including the floors, trim, and swapping out fans for lights on switches throughout the house.  The rest of the items that I can remember:
Curtains (fabric and seamstress): 150
Curtain rods: 35 steal at TJ Maxx
Curtain rings: 20
Light: 278
Hooks: 16
Closet knobs: 40
Headboard: 300
Paint: 60
Total: $899
Not cheap, but considering the headboard and light are 2/3 of the amount, I think I did pretty good.  And here is a regular sight in our room....why he wants to sleep on our floor is beyond me!

Friday, July 24, 2015

Our house is sold! And, presenting our master bedroom.

Ok, I've been totally missing in action because we've just been so busy with all our house shuffling.  We sold our home in 6 days, which is awesome!  We got 5k over asking, with us paying 8k for the buyers closing, so netting 3k under asking.  Not bad.  The buyers are also paying a $1350 assessment for repaving our street about a month ago.  We are totally happy and relieved because we are getting more than we thought we would and it sold so quickly.  I think part of the reason is the awesome master suite.  Here's a few before and afters of our bedroom:
I chose BM Edgecomb Gray for the walls, it is a very nice neutral that reads warm gray.  A favorite with designers, I'm told!  While the tan looks ok in these very bright photos, it was quite dark and dated most of the time. 
I didn't make a huge effort in here, because we really hadn't done anything in here when we found out we were leaving.  I painted, changed out all the almond switches and outlets for white, hung some art and got new bedding at Crate and Barrel.  We also put down the rug from our old dining room for lack of a better place to store it.  I'm not really a fan of rugs over carpet, but it worked fine in here.
In the walk in closet, I bought a Malm dresser, hung my DIY crystal chandelier, and put up some hooks. 
And now that I'm looking at the 'before' pic, I'm realizing there is an outlet in this closet behind the hamper that I didn't know about.  Doh!  That might have come in handy.  The little area in the back corner has always been useless because of the door to the cedar closet swinging out.  I just put my little side table there with a lamp, but I'm sure I could've come up with something more creative if we were staying. 
Speaking of the cedar closet, this is what it looked like before:
The space was too small to put any shelving on the other walls, so I bought these hook rails from Target to at least have a place to hang hoodies and jackets. 
And here is the after.  Mind-blowing, I know. 
I kept it simple with two hook rails, the little black rack for baskets, an accent rug to cover the hideous flooring, and then some baskets on the existing shelf and platform under the hanging space.  Functional, if not pretty!  I realize we have a hoodie addiction.  This is definitely not all of them. 
By the door to the room we had some space, so I created a little area with a $5 ottoman from Target, a Pier 1 pillow I've had forever, and my trusty Keep Calm and Carry On poster.  You can all slap me now.  I just am seriously too lazy to change it to something new.  I'm also too lazy to take a closer photo. 
So, that is that.  Shaun's closet across from the walk in is also huge, so we had a ton of storage in this house.  I will miss it dearly!  We did find another house in IL, but I'm going to share it in a different post.  It's a project to say the least!

Wednesday, January 22, 2014

My new walk in closet

The last time I showed the master closet, it was looking like this:
I had my vision all marked out on the wall with tape, and then I went about ordering all my materials.  The boob light (and the tape) was taken down...
I put up a plain bulb light fixture - ok, it was just hanging by the wires in this photo - painted the trim, and painted the walls with my bedroom color, Behr Aqua Smoke....
Floor trim went in, my DIY crystal chandelier went up, my DIY window treatment went up, I accessorized, hung pretty hooks, and here is the finished product!  

Oooo, I love it!  It actually holds most of the stuff from the dressing room.  There is a lot of hanging and folded clothes storage in this 4x5 space.
It all came together exactly as I thought it would! 
Here are some details from my fabulous little space.  This DIY Faux window shade was so easy!
The chrome rod/shelf supports are from Closetbay.com, I got three for each rod to avoid sagging.  They are shiny and fabulous!  The white laminate shelves are from Menards and Home Depot.  
The small chrome self supports are also from Closetbay, and came two per pack which was a great price!  
The rod and shelf supports come out exactly to the depth of the window trim, so it all worked out perfectly.  I used my signature stained wood closet rods in here, of course!  
My crystal chandelier, which will be shared as a separate post.  It was so worth doing myself instead of buying a fixture!
My favorite crystal hooks from the Home Depot...fun fact, the wall anchors in this wall just kept falling back into the framing because whoever drywalled this room used the thinnest crap drywall ever.  Needless to say, all the shelf supports are in studs!
When I saw this funny postcard I had laying around the house, I knew I had to find a pretty frame to hang it up in this closet.  I hope potential buyers find it funny when they see how my clothes take over just about every closet in our house!
The gorgeous hand loomed cotton rug is from Overstock, I love it.  It is a good complement to the orange Moroccan tile rug in the bedroom, without being too matchy. 
The shoe rack was dug out of storage, and the white storage unit for my sweaters and jeans was a cheapo Room Essentials bookcase from Target.  I also added a little clasp for the original window shutter to keep it closed, it was brass and I sprayed it white. 
The little white cloth bins I found at Shopko for $5 each, what a steal!  I have all my tights and dress socks in those.  
So, that is the new closet.  The incredibly hard to photograph closet.  What do you think?  Is it worthy of taking over the duties of the dressing room?