This tiny room. Good gracious, it has been such a pain in the ass. When we moved in, it looked like this.
Super shiny paneling, dark trim, granny valance, metal blinds, old timey fan with light...that wasn't hooked up to the wall switch. Lots of goodies in here. The paneling and valance lasted about 3 minutes after we got the keys.
And then after the paneling and all the trim were totally removed, the floors were refinished.
It took us a long time to get to this room after this. This lower pic was taken on 10.3.15, and for the next year it looked just like this...with the bed just piled full of crap and no progress whatsoever. This is what a house with no storage space looks like! (When the DIYer in the house is a borderline hoarder, hugely pregnant, and gives birth to a stage 5 clinger.)
Then, we finally had some help with the kids in September of this year, and Shaun pretty much single-handedly put up the plywood for the feature wall we decided to do over the ruined drywall. I wanted to do a wainscoting wall rather than just re-drywall. We used 1/8 inch luan plywood, 1x3 pine boards for the outside frame and the inner cross pieces, and the standard 1x4 MDF boards for the base trim.
Unfortunately, we cut the plywood wrong and ended up with a seam where it wouldn't be covered by a vertical board. I decided to just let it go and do my best with spackle and paint. I can't say I'm thrilled with the decision, but it would've been way too much trouble to rip this all out and redo it.
I was trying to figure out the easiest way to get the horizontal pieces evenly spaced, and cutting strips of cardboard to visualize seemed like the easiest way.
We were able to measure, move the cardboard, and make sure that it looked good to the eye, in addition to being spaced evenly with the tape measure.
Shaun ended up cutting each horizontal piece individually, because they were all slightly different in length due to the walls not being perfectly level. It went pretty fast once we got down a rhythm, though!

Before we knew it, the whole wall was trimmed and ready for spackle.
This part was time-consuming, but I use simple Drydex spackle, rather than wood filler or caulk. It dries and sands faster, and is much easier to work with.
I know many people add additional trim inside the boxes to make it look more substantial, but for now, the simple look wins. And then after many hours of sanding....primer!
I'd like to share my thought process for designing a room. Since we've moved so many times, and have always seemed to downsize, I have a lot of stuff - and first look at the large items I have that must be used in the room. In this case, I had our teal 6x9 Crate and Barrel rug that was the only one to fit in this room. The room is a little short of 10x10, so the 8x10 rugs we had wouldn't fit by the smallest margin. It was frustrating, because I had beautiful fabric I wanted to make curtains out of for this room, but it went with the yellow tile print rug that ended up in Zach's room.
So, this rug had to be used in here. I also had bedding that wouldn't work in our bedroom, that I wanted to use in the guest room. Mainly, the coral duvet set I bought to stage our master for sale in Minnesota. Also, the art work pictured below would be added to the guest room. (We gave away the 8x10 rug pictured here to a friend)
I also wanted to be able to use the orange tile print duvet we've used in our master in Wisconsin.
With the rug, bedding, and art on deck, I knew I had to tie it together with the curtains. I'm a huge fan of using curtains to marry other elements of the room that may not otherwise work out. I happened to be at
World Market when I saw these beauties.
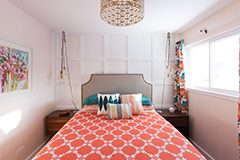
This curtain had all the colors I needed, as well as being slightly retro in style and impossibly girly. Perfect! I grabbed the last two available at the time (they are back in stock now!) and then went about finding the perfect paint color. Rather than sticking to grays like I usually do, I wanted to do something different. I had some leftover samples of coral-ish colors, but none of them were quite right, they were all too pink. Then I came upon SW Posy in my fandeck, and it was so nice! It looked pink going over the peanut butter color, but more peachy/yellow undertones when dry.
I was so happy to cover up that tan color.
I was also thrilled to find these cool pendant lights at
Target, which became my inspiration for the rest of the finishes in the room.
The black cords inspired me to incorporate black into the curtain rod. I fell in love with the acrylic rod at
Ballard Designs, with black hardware. I thought about brass hardware, but black seemed to fit in best with the black rods and lights throughout our home.
Then, I scouted around for a ceiling light to utilize the new wiring our electrician put in. I settled on the Young House Love drum pendant from
Shades of Light in gold. But, it came with a brushed silver canopy that had to be changed. A quick spray with black and I liked it much more.
Then, I needed a headboard. Again, Target was my savoir and had this gorgeous
headboard on sale for $220! If you are looking for one, this is an amazing deal for the price and quality! Definitely check the sales, because it can go all over the place in price. I think it's well worth it at the list price of $300, though.
Now, in the meantime of all this shopping goodness, I was painting two coats of white on the feature wall, and on all the new trim in the room. It took forever. In fact, I found an old iced coffee I'd left in there in September when I went to continue work on the space in December. Mmmmm, think it's still good? Did you know black iced coffee could mold? Yikes.
So...the day before my baby's 1st birthday party, I decided rather than cleaning my house, to work on this damn room. I swore to myself that it would be done before the party. And, it was!
You may notice the headboard in here is from our bedroom, rather than the new one. I decided the cream headboard looked weird against the very white wall, so I swapped them. I think the cream headboard looks so much better in our bedroom! And, it's much nicer overall, and we deserve the best, right?
But back to the room at hand...I'm so in love with the way this all turned out!
The pendant lights look incredible, and give such welcoming light. I don't mind the black cords hanging down at all.
This room gets beautiful afternoon sun, and I look forward to hanging out in here with the kids, reading books and playing.
The curtain rod was kind of hard to install, since it's all one piece and not adjustable....but it looks so good up! And since there are no adjustable areas, the rings glide so smoothly.
The vintage nightstand I already had works perfectly in here.
I wanted another nightstand for the other side, and couldn't find a vintage one I liked enough in the past year of looking. I went ahead and bought this simple walnut one from
World Market. It's nothing special as far as looks, but it's solid wood, was on sale for $150, and the dimensions match the other one.

I got these coasters years ago as a gift, and I still love them!
These hex knobs are from
CB2. Much better than the plastic round ones they replaced.
The art looks so good in this room!
And the smaller prints were a later addition from our master. They fit much better in here. That shelf is an old piece I was given by a friend back in Wisconsin. It's served us well for years!
When I walk past the open door, it makes me so happy. Wrinkled duvet and all.
And at night, the ceiling light adds that beautiful pattern on the walls. Love it!
We've already had a lot of nice moments in here. (This is my brother, uncle Brian)
This stinker is always taking that piece off the nightstand and throwing it on the floor somewhere.
I'm so happy this room is done, and I'm also pleased to have done something so different from everything else I've designed. Here's a final before and after. Let me know what you think!