Monday, December 7, 2009

Where did you get that?

Several readers have asked me questions about paint colors and items in my house, so I've put together a source list for all the rooms I've already posted about.  If I know the item is still available, I have linked to it - though I don't know if the links are still valid.  All the trim, built-ins, and stairway risers/balusters in the house are painted with Behr Ultra Pure White in a satin finish, except for the den.

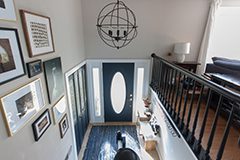
Entry Hall and Stairway
Paint colors:  Ralph Lauren Reflecting Pool (color-matched to Behr) and Behr Antique White.  Stairway stain is Varathane Espresso.  Accent rug is from the Jaclyn Smith collection at Kmart.  Chandelier is Kichler, from Lighting Universe
Ajara foyer table from World Market, lamp from TJ Maxx, glass container from Pottery Barn.

Living Room
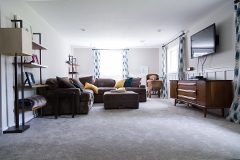
Paint Colors:  Glidden Bark on fireplace wall.  Behr Cup of Cocoa on the rest.   Floor stain in living room is Old Masters Cedar. 
             
Starburst mirror, white vases and candle holders from TJ Maxx/Homegoods.  Fireplace screen and tool set from Home Depot.  Small accent table near fireplace from World Market.  Wood nesting tables (left of big chair and left of couch), Hamilton Floor Lampvelvet linen pillows, Zebra rug all from Pottery BarnRound tray from Target.  Furniture was given to me by my parents, it is BenchCraft purchased at JCPenney. 
           
Teal velvet curtains and Ryan storage cube from World Market.  Floor lamp from Crate and Barrel.  Media stand from American furniture.  Baskets from Hobby Lobby.  Curtain rods from Target.
Red lamp and faux fur throw from Pier 1.  Pillows from Burlington Coat Factory.  Curtain in stairway from World Market

Dining Room
Paint color: Behr Antique Red, Behr Ultra Pure White on moldings.  Drapery rod also from TargetCurtains from Pier 1, now unavailable.  Table and chairs were DIY.  Candy jar from Pottery Barn.  Pottery Barn 'Bennett' rug found on ebay.  Chandelier found used on Craigslist.  Table runner from World Market.

Downstairs Bathroom
Paint colors:  Ralph Lauren Reflecting Pool and Behr Popped Corn on beadboard.  Kohler Memoirs pedestal sink, toilet, faucet.  2 sets of double shelves from Overstock.comTP holder and glass vase from TJ Maxx.
Bathroom light by Quorum.  Glenshire mirror, towel ring and towel bar (not hung yet) by Moen.

Guest Bedroom
Paint color:  Dutch Boy Not So Neutral.  Bedding and rug from Target.  Curtains are made from Dwell Studio fabric.  Throw pillow and lamp are from Target, no longer available.  Nightstand and tall dresser from Pier 1.  Mirrors are from Hobby Lobby.
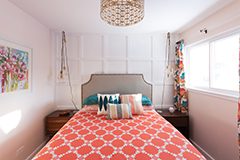
Master Bedroom
Paint color: Behr Aqua Smoke.  Comforter from TJ Maxx, Pottery Barn Moorish Tile rug found on ebay.  Headboard made by my amazing mother!  Orange shams from Pottery Barn (no longer available), white quilted shams on clearance, also from Pottery Barn.   Crystal lamps from JCPenney.  Bird decorative pillow from Target.  Two other throw pillows from Etsy sellers pipdesigns, Lilybethgoodies.  Curtains from Ikea
Chandelier from Overstock.  Slipper chair also from Overstock.  Hobby Lobby table painted white, lamp from TJ Maxx.  Keep Calm poster from Etsy seller pressureless.  Aqua pillows on trunk from Target and Linens n Things.  Accessories collected over time. 

Master Closet
Behr Aqua Smoke paint.  Moorish Tile Pottery Barn rug from Ebay, dresser hardware and crystal hooks from Home Depot, crystal pendant chandelier from Overstock

Master Bathroom
Paint color: Behr Aquatone.  Light by Quorum.  Black and aqua towels and rug from Kohls.  Window mistreatment fabric from JoAnn fabrics.  Art prints from Hobby Lobby.

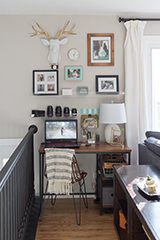
Hallway
Floor stain: Varathane Espresso.  Paint color: Behr Antique White.  White accent table from Ikea.  Mirror from Hobby Lobby.
Gallery frames from Kohls
Zig Zag runners from West Elm.

Den
Wall color is Glidden Bark.  Ceiling paint is Behr Harbor Sky.  Bookcases, desk, trim all painted with Ace Cabinet and Trim paint in Ultra White.  Light fixture from Overstock.  White wall frames from Pier 1.  Lattice couch pillows from Pier 1.  Teal pillows from Pier 1.  Dorset sofa by Rowe.  Chair pillows included with couch.  Rug from Crate and Barrel.
Cane chairs from Craigslist.  Dresser from Craigslist.  Samsung 42" plasma from Best Buy.  Bronze double curtain rod from Target.  White curtains from Ikea.  Large mirror from Goodwill. 
Tray and accessories found at local stores.  Crystal pendant light from CSN

Dressing Room
Wall color is BM Coventry Gray.  Light from World Market, but no longer available!  Hanging racks are TJUSIG hat racks from Ikea.  SMADAL bookcases hold my folded clothes.  Bench and cushion from Pier 1.  Curtains were DIY with clearance fabric from Joanns. 
Wicker dresser, wall mirror from Pier 1.  Pink frames and crystal lamp from TJ Maxx.  Mirrored tray and gray pillows from Target. 
Rug is Pottery Barn Moorish Tile rug, found on Ebay.  Mirror is just a door from a wardrobe we already had and took apart.

Art Room
Paint color: BM Hale Navy.  Desk from Ikea, painted white.  Curtains DIY with clearance fabric.  Lamp from TJ Maxx.  Dali bamboo shade from Overstock
Jute rug from Overstock

Porch
LENDA curtains from Ikea.  Dali bamboo shades from Overstock.  Lamps were DIY.  Rattan tables were DIY.  This End Up classic loveseat found on Craigslist and painted white. Outdoor pillows from Pier 1, no longer available online. 
Jute rug from Pier 1.
Minka Aire ceiling fan from CSN

Let me know if there is anything I missed.  Many of my small decorative items are from TJ Maxx and Hobby Lobby, which makes finding them impossible.  Although, I will try to help whenever possible!

Sunday, December 6, 2009

Oh yeah, I LOST

Like, big time.  I'm referring to the Old House Web blogger contest in which I was a finalist.  I got nada.  Well, I shouldn't say that - I got nice comments, several votes, and lots of people got to see my blog because of it, so I'm happy.  Plus, two of my favorite blog 'hauntees' won $100 gift cards to Lowes...congrats to Oh! Apostrophe and DIYdiva!

Thank you so much to everyone who voted for me, and also a big HELLO to all my new readers!!  I'm so thrilled to have you all 'following' me and I will be perusing all of your amazing blogs while I should be working on my own house! 

Friday, December 4, 2009

This is what $3,000 looks like

Our Tempur-pedic mattress was delivered today, it all it's rock-hard glory:

What does $3,000 smell like?  Well, it's less 'Chanel' and more 'chemical spill.'  Let's hope it airs out soon.  Also, check out my old mattress looking ashamed in the hallway:

Yes, old mattress.  You should be ashamed.  I will review this massive purchase after we get a couple nights sleep on it.  You know, when it softens up and doesn't smell like a latex factory.   

Thursday, December 3, 2009

Don't worry, I painted it

Because I have posted all these late-summer patio pictures, I feel compelled to share that there has been some 'concealing of eyesores' since then.  The rusty green monster is a bit prettier now, as well as the gas meter and some of the downspouts:
I also took a paint brush to the rain barrel that I got from the city for $30.  It was previously a lovely shade of royal blue, which explains the cheap price.
I used Rustoleum 'rusty metal' spray primer first, which is actually rust colored.  Does anyone else see the humor in that?  Then I followed up with Behr 'Sweet Tea' exterior latex paint which I think blends nicely with the brick.  As for the very expensive firewood we have stacked in that alcove, I'm hoping we will use it all up in the fireplace this winter so I don't have to conceal it, or look at it anymore.  It makes me as mad as waiting 9 months for more freakin episodes of LOST.  Jeez, ABC!

Wednesday, December 2, 2009

'DIY or die' patio

For those of you that asked, and have nothing to do for the next ten hours, this post is my long-winded and unprofessional recap of how we (along with my wonderful parents) DIY’d our patio and took the space from THIS:
To THIS:  (you can see more glamour shots in my initial post here)
We had started digging out the area in question (oh so leisurely) over the course of the summer, but things really started to gear up around the end of July.  We got the area mostly dug out by early August, which is when we got our quote (for over 8k) for a professional patio.  We thought it would be cheaper because we already dug it out, but NO!  So, we ordered our materials and had everything delivered on August 14th.  We also had a big party planned for August 29th!  It was tight, but we made it in time.  Here are the steps we took:

Plan it!  We drew a diagram of the area we wanted to pave, noting our big ole A/C unit that we would have to go around.  See the following 'Microsoft Paint' rendition of the area, totally not to scale and looking like a 5-year-old did it:
To deal with the huge A/C unit, we decided to do a width of 9 ft near the sunroom door, and a larger width of 11.5 ft after we got past the beast. The total length of paved area was going to be 30 feet.  We went to the stone yard with our measurements, and picked out our pavers - a beige and red cobblestone combo from Belgard.  The dealer there wrote out everything we needed, he was definitely the expert when it came to supplies and quantities needed.  Don’t try to tell them how much you need...even though 11 tons of gravel sounded outrageous, we used it all!!  Note for planning your patio shape: curves are hard.  Straight lines are easy.  Keep it easy.  Just sayin.

Prepare it!  Contact your local utility companies before you begin excavation!  We didn’t, and that was STUPID, even though we didn’t hit anything.  We drew out our paving area with spray paint, going a bit larger than what we were actually going to pave because you will always lose some area when you start laying down the edgers.  Then Shaun rented a (manual) sod cutter, and got sweaty with it for an afternoon.  It was intense and backbreaking to get all the grass out.  The sod cutter is much nicer than just using a shovel, because it takes out the grass in a nice even depth and width, where a shovel takes out uneven chunks. But it was still manual labor!  Oh, and it was a nightmare to get rid of the huge pile of sod.  Most dumps don't take it.  I'll spare you the details of that drama.

Dig it!  We followed the recommendation from Belgard to determine our depth.  Where there is only pedestrian traffic, a base of 4”-6” of processed gravel is recommended.  To achieve this, excavate 7”-9” to allow for base material (we used 6”), sand (we used 1”) and pavers (they are 2.5” thick). You want your patio to be above the ground about .5 inches to allow for drainage. Once we determined our 9 inch depth, it was time to get DIGGY with it.
The digging went on for days and days.  Sometimes neighbors came over to help, sometimes family came over to help, but it was mostly us two cursing at the thick clay dirt we were pulling out.  And, we had to mound up all 11 tons of dirt behind our garage….we had people coming for free dirt (thanks to a Craigslist ad) for weeks.  A couple wheelbarrows are very necessary for this part!  Measure your excavated depth carefully, because you don’t want low or high spots.  In no way do you want your pavers to be beneath ground level!  We made sure our hole was even everywhere by staking a string across the entire width every couple feet, then using a tape measure to make sure we were at 9 inches the entire way. 
When we were high, we dug more dirt out. When we were low, we added some. THIS TAKES FOREVER BUT IT IS VERY NECESSARY!  Also in this pic is one of the cubic yard 'tote bags' that the gravel and sand came in. They were a lot nicer than having piles of stuff right on the grass!

Rock it!  Compact the surface of the excavated soil with a plate compactor (we rented one for a week, $200).
For small areas a hand tamper works great, we used one of these for getting into the corners, and ‘perfecting’ the sand later on in the process. Fill the excavated area with your crushed stone approximately 5” thick, use your strings to measure how high the gravel is.  Yes, this is the labor-intensive part where you wheelbarrow your shiny happy butt back and forth from the piles (or tote bags) to the pit over and over.  If we were lucky, we could've had the delivery guy dump it all right into the pit, however our driveway and the opening to our neighbors driveway was too narrow for his skid steer to fit into our back yard.  So, it all got dumped on our grass in the front yard and we hoofed it the entire time.  BOGUS.  We hired a guy to help with this part, it was so worth it.
Compact it with the plate compactor, wetting the gravel lightly if needed.  When you can walk on the gravel without causing an indentation, you can add more gravel until you are at 6 inches thick (3 inches from your string) and compact again.  Try to slope the surface for water drainage, but you can also do a little of that with your sand layer too.  The slope should be 3/16" per foot, nothing dramatic or visible to the eye.  Use your strings and tape measure, or you can use a line level on the string to determine the slope.  A note about the compactor – it only goes forward, not backward. So for those tight spots where you can’t continue going forward, use the hand tamper or you will mess up your gravel!

Edge it!  Edge restraints should always be used to prevent the pavers from spreading. You can use PVC, aluminum, concrete, pressure-treated wood, a ton of different things, but we went with the heavy plastic edging strips that the dealer sells.  They should be flush against the compacted gravel.  There was a lot of ‘playing around’ with the edging as we were installing the pavers.  We would pound a couple stakes through them, then adjust them and fully pound all the stakes in after the pavers were laid.

Uh, Sand it! (there's really no cute directive for this step)  Here is the official way to put in the sand:  Place 1” (outside diameter) pipes 6’ to 8’ apart down the area to be paved.  Measure the distance from the string lines and the screed rails at several points and adjust the height of the rails by putting sand under them or trimming the base underneath if too high.  Hand pack sand around the rails to hold them in place.  Spread 1” of sand between the rails until it is slightly higher than the rails.  Use a 2” x 4” board to drag across the top to smooth and level the surface.  Fill in the low spots and repeat.  Remove the rails and fill in the indentations with sand, and trowel smooth as you are laying the pavers.  Do not step on, compact or wet the sand after you have finished screening.

Here is what we did: Dump in sand.  Play with sand until smooth-ish.  Make sure sand level is 2 inches from string all around. Start laying pavers and add or take away sand as needed. It takes forever, but we had a very sloped side yard and the screening just didn’t work for us, we had to adjust the sand for each individual paver separately, using a level.  UGH.  Here we are playing with paver patterns, edgers and sand levels to get the hang of it:
ps - those are my dad's feet.  What is it with dads and bright white sneakers?

Pave it!  Starting in a corner, lay the pavers in the pattern you have chosen.  We worked in rows, and because we chose pavers of varying lengths, we were able to work it out so we didn’t have to cut anything.  SCORE!  Leave a 1/8” space between pavers so there is room for sand.  Periodically check the outside edges of your rows to make sure they are straight. We knew we wanted the patio to be the same distance from our house/garage the entire length, so we used a 2x4 with marks drawn on it and held it against the house to see if we were on track.  This is another reason you want your edgers to be moveable, because sometimes you will need to tuck it in closer or move it out a bit to get that straight line you want. 
To progress from one row to the next, we placed the pavers and then checked out with a level how it related to the previous row.  We used rubber mallets to pound them in tight.  Every few rows, we would put a long board on the finished area and slap a level on it to see how level/sloped we were.  There was LOTS of adjusting.  The process of laying the pavers took so many days, it was crazy.  Sometimes we would find one whole row was too low, and out came an hours' worth of work.  That is where the beer came in.

Cut it!  We didn’t have to cut any pavers, but if you do, you will want to rent a diamond blade wet saw.  You can use a paver splitter or a hammer and chisel, but you run the risk of breaking your pavers.  If possible, keep edge stones to one half paver because smaller pieces are too vulnerable to cracks and aren't a good idea.  We edged with 4x8 pavers set in a 'soldier row', and we made the patio just as long as 95 full pavers were, so we didn't have to cut.  Does that make sense? 

Set it!  Sweep the surface to remove any debris.  Spread polymeric sand over the surface, sweeping it into the joints.  You can compact the surface again if you like, but we didn’t - and don’t feel it is necessary because we did such a good job of leveling everything and really pounded the pavers down.  Keep going until all the joints are filled, and try to make sure there isn’t any big clumps of sand on the surface of the pavers because polymeric sand dries to a hard finish.  Don’t just use playground sand!  Polymeric is what you want because it hardens and won’t let weeds grow in between the joints!

Wet it!  After you get all the sand into the joints, sprinkle the entire area with the hose. Do not use the ‘jet’ spray!  You just want to get it wet to activate the hardening qualities and then you have to let it set up.  Keep rain off the patio for at least two days, or it could wash away the sand.  We had tarps on our patio for three days until we finally got some sun!   

Still to do!  As you can see in this pic, the seat wall stones are just dry-laid for now.  We ran out of steam before we could finish, so that will be a project for next year.  We need to configure the stones the way we want them, cut a bunch in half, and then use the concrete adhesive to make it all solid.  For now, they are safe to sit on but I don't tend to sit outside during WI winters, so it doesn't really matter anyway.  This is also a close-up of the polymeric sand in the joints, it looks really solid once it dries. 

But what did it cost ya?  Here is our invoice breakdown from the stone yard: 
230 sq ft Belgard Dublin 4 piece Brittany Beige 575.00
60 sq ft Belgard Dublin 4 piece Brownstone Red 150.00
53 sq ft Belgard stone 4 x 8 Brownstone Red for edging 132.50
60 Belgard Weston universal wall sandstone/25 Bannockburn red 186.00
5 – 10.5 tubes concrete adhesive (for seat wall) 21.50
10 – 8’ pieces beast edging 115.00
80 – 10” edging spikes 36.00
3 – bags tan polymeric sand 72.00
11 ton ¾” crushed limestone “traffic bond” (in tote bags) 220.00
2 ton torpedo sand (in tote bags) 40.00
2 – forklift deliveries to Racine 340.00
Total for stone yard supplies: $2100 minus refund for totes
Then we paid for separately:
Compactor rental 200.00
Help with gravel 100.00
Total for extra expenses: $300
Then I made it pretty:
Patio table - $140
6 patio chairs - $300
End table - $40
6 throw pillows - $40
6 seat cushions - $60
Umbrella - FREE gift from neighbor (thanks, Margo!)
50 pound umbrella stand - $85 and worth every penny
Fire pit - $100
Total for decor: $765
$189 was refundable when we returned the pallets and tote bags to the stone place, however we are dumb and didn't realize they wanted the pallets back.  Instead, we spent an entire day cutting them all up and trying to find places to put them, how to throw them in the trash, etc, etc.  DON'T BE THAT STUPID!!!  Actually read your invoice!  We only got $90 back for the tote bags.
**Grand total: $3165** 

Supply list:  Beyond what was given to us by the stone yard, we used very basic tools for this project.  The compactor and sod cutter were the only rental items.  The rest were:
shovels
wheelbarrows
boards to use as ramps
boards to use for leveling and measuring purposes
rubber mallets
3 pound hammers to drive in the edging stakes
twine for measuring
gardening stakes for attaching the twine
levels
tape measures
screwdrivers for lifting up pavers that were already installed
rake for smoothing sand
buckets for toting around extra sand and gravel as needed
knee pads
booze (yes, this was a requirement for me most nights)

Bottom line: It was a ton of work. We yelled. We cried. We almost redid the entire thing a couple times. It is not perfect. There are a couple low pavers, but we can dig them out and redo if we want. We are extremely happy that we did the entire project for $2400 (not including the furniture and decor) instead of $8200! Our edges aren't completely wave-free, but grass will grow and no one will see that. All in all, I would do it again in a heartbeat.  Just don't ask me to help with yours!  Not in person, anyway :) 
THANK YOU Mom and Dad for all your help with this patio!

Tuesday, December 1, 2009

I've been 'Reader Redesigned!'

A big thank you to John and Sherry at Young House Love for featuring our back-breaking patio project on their blog!  It was definitely the hardest thing we've ever done to our house, harder than refinishing our hardwoods, renovating our stairs, and adding chair rail and picture molding to our dining room.  I can put together a little cheat sheet on how we did the patio, if there is any interest?

And to those new folks who are stopping by my blog from YHL, welcome!  I love new readers like I love wine.  And that's a lot.  Well, if you keep reading my blog you'll figure it out....

Cheers!
Sara

Sometimes it's better not to know

Google analytics tells me that 74% of my visitors stay on my site for 10 seconds before leaving.  Ouch.  Maybe checking the stats isn't such a good idea.  Or, maybe I need to put this picture on the top of every post:

(Image lifted from, oh everywhere on the internet)
That would get me at least 20 seconds of viewership, right?