Showing posts with label Art Room. Show all posts

Monday, August 16, 2010

I'm a winner!

My friends over at One Project Closer have named me the best renovator ever picked my art room renovation as their weekly winner in their 'Before and After 2010' contest supporting Habitat for Humanity! 
The contest runs for the summer, and anyone can submit a project to the One Project Closer team at beforeandafter@oneprojectcloser.com.  Every week, they choose the best submission and that person gets to choose a $50 gift card to Home Depot, Lowes, or Amazon. Plus, they make a $100 donation to Habitat for Humanity in the winner's honor!  I always spend at least 1 day per summer sweating profusely on a Habitat build in my area, so this is a very cool prize.  Winners of the weekly contest also get entered into an end-of-summer showdown where readers can vote for the best Before and After, and the winner will get another $150 to the home improvement store of their choice.  I will be doing my best to blackmail votes out of you lovely folks when the time comes, trust me! 

I submitted the art room project because it involved a little of everything: some building...
some mitering and nailgunning (yeah, I can make up words around here)...
some staining and polying, along with some wine spilling....
plenty of sanding, priming and painting....
and of course, decorating.  Check out the post over at One Project Closer here!  And if you missed my original post about this room, be sure to click on the photo on my sidebar, all the juicy details (including a cost breakdown) are there. 

PS - definitely enter your own before and after, there are still a few weeks left in August!

Friday, February 19, 2010

Art room is finished!

Remember when it was 'The Shining' room back in December? 
Well, it looks nothing like that anymore!
LOVE.  My favorite shots of the entire room are the night ones, the wall color is soothing, yet dramatic.  But we do get a lot of western light during the day as well:
 
Here is another before and after shot of the 'ballet bar' wall:
These are art pieces I did in middle school (yeah, I was 12)...the one on the right was featured at the Frank Lloyd Wright-built Wingspread in Racine as part of a 'young artists' collection.  It then traveled all over the world, all the way to Japan and back.  Yeah, I'm kind of a big deal.  It sustained some water damage on it's travels, but I still love it.  My mom saved the gallery card for me....check out my really long Polish last name! 
 
There is a place for everything in this room, but the only furniture is the desk and chair, so there is still a lot of open space.  About that chair....I think it's too big and roll-y and it is an OFFICE chair, not a PRETTY, SOPHISTICATED chair.  But Shaun vetoed getting rid of it in favor of a lovely upholstered-seat number. He thinks it's really comfortable, and so for $0 it gets to stay. At least it's black and not too offensive to the eyeballs.
 
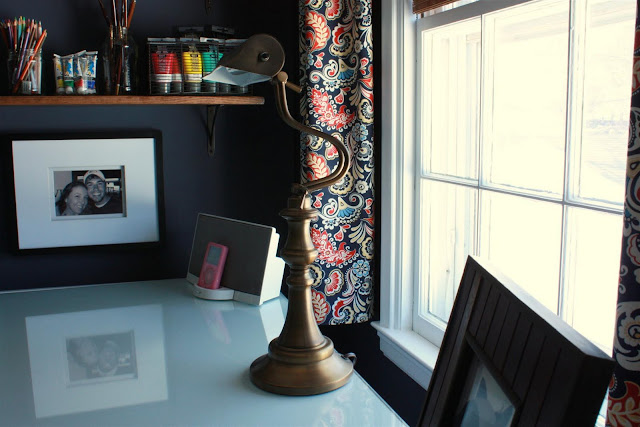
I wanted some rustic-looking shelves to hold all the art supplies. I had a Home Depot dude cut a medium-quality 6'x 8" pine board in half and then I sanded, stained and poly'd the 3' pieces using the materials we already had. The board was $5. Then I found 4 shelf brackets at Menards for $2 each. I made the two shelves for $13, and I love how they turned out!
Our art supplies got plopped into various receptacles: The large acrylics are in a metal utensil caddy (?) I picked up at Goodwill for $1.99. The brushes, colored pencils and small acrylics are in: a pasta sauce jar, a salsa jar, and a 3-wick candle jar, respectively.  The palettes, pastels, and other miscellaneous items are in a Pier 1 basket I picked up for $8. I also have another one holding sketch pads and other items in the cubby under the desk. 
The IKEA 'cubby' that came with the desk originally holds all of our paper pads, sketch pads, notebooks, etc.  We also have large canvases slid in between the wall and the desk. 
The lamp was purchased at TJ Maxx (finally, I got something with Shaun's discount!) for $27.  I was originally planning to spray it bronze, but the antique brass finish grew on me and I rather like it in this room, just as it is.   
I already talked about the window treatments, but I forgot to mention the rod and clip rings are from Menards. The rod was $12 on clearance. I loved the finials, but it was a short rod (24" - 48") so in order to stretch over our 30" window, I had to use a center bracket to avoid a sag in the middle. I'm not thrilled about that, but I love the rod and they didn't have a bigger one, so I will live with it.  The rings were $5 a pack, and I got two packs. $22 total for the curtain rod.  The fabric was $24 after a 40% coupon.
The rug was the biggest expense. I wanted a natural fiber rug because we had a wheely chair, and I didn't want a plush rug in a room with acrylic paints being thrown around, so I thought this was the best bet. It was $156 on Overstock.com, but I'm sorry it is out of stock!  I literally got the last one. I love that it is 8' square, it fits in here perfectly.
And because I know Shaun will need inspiration while drawing, I put a picture of my butt on the desk.  This was taken by him while we were on our first (and only) cruise together in 2008.  I was checking out the water from our balcony, not losing my lunch, just in case you were curious! 

I'm pretty excited that we now have everything all in one place, at our fingertips. And I can always hijack the table if I have some other crafty thing I want to work on. So, did this room live up to all the hype?  Did I drag it out too long? 

Source and price list:
Rug from Overstock - $156
Wall molding from Menards - $98
Urbino track light from Menards - $60
Desk lamp from TJMaxx - $27
'FC Besame Fiesta' fabric from Joann - $24
Bamboo shade from Overstock - $23
Curtain rod and rings from Menards - $22
Baskets from Pier 1 - $16
Rustoleum Oil-Based enamel in Gloss White - $9
Shelf brackets - $8
2 cans Cover Stain primer from local store - $5 (a STEAL!)
Pine board for shelves - $5
Goodwill basket - $2

Total - $455, definitely more than I wanted to spend.  However, the big ticket items were (as usual) the floor covering and the wall molding ate up some decent cash, too.  I think it was well worth it in the end! 

Thursday, February 18, 2010

Ad(dressing) the window

Before I could put up the pretty bamboo shade I bought on Overstock.com, I had to address the crumbly, yellow and downright sad window in the art space.  This window is in fine working order, but unfortunately was a huge eyesore due to bad paint jobs and general neglect.  
It is missing chunks of wood and glazing, and really needs to be redone when it gets warmer out.  Until I can do some structural work, a new coat of paint was necessary to stop the assault on my eyeballs.  And your eyeballs.  Because your eyeballs are the whole reason I have this blog!  See, I painted this window for YOU! 
I usually use BIN primer on windows, but I had a gallon of BEHR 'Premium Plus Ultra Paint And Primer In One' that our painter used on our living room windows.  I thought I'd sand everything really well, and give this product a spin instead of using a separate primer. 
It wasn't half bad!  It is definitely not as good as using shellac-based BIN to seal up the wood and smooth over bumps, but it did the job.  And this was just about looks, since I'm going to take my time with this window later on.  When I paint windows, I always run the paint onto the glass to create an extra 'seal' between the glass and the wood. 
Oh my, the up-close shots are still not too pretty.  Just pretend there is another coat and it's lovely, ok?  Oh, and also pretend that I have cleaned the glass.  Also pretend that I have cleaned the outside glass on every window in our house since we moved in.  Ahem.
The day after painting, I come in with my favorite tool, the glass scraper.  If you can rest your hand against the sill or frame and keep it steady, it is quite easy to scrape the excess paint away in long strips.
And the bonus is that you make all this fun 'latex confetti' that you can throw up in the air while singing and dancing to "The Safety Dance" give to your cats to play with!  Actually, they might eat it, so just do the 'confetti' thing and not the 'plaything' uh, thing. 
Once I was able to get a coat of fresh white paint/primer on the window, I felt ok about installing my bamboo shade.  I try not to HIDE bad things with pretty things, you know?  It's all about homeowner integrity.  Just don't peek underneath all our ceiling medallions.   
This shade is rad.  If you are in the market for some shades, Overstock.com beat Home Depot's price by 8 bones, and there are many more styles and sizes on Overstock.  The inside of my window is 29.5 inches, and trying to find a 29-inch shade was difficult.  I left several stores pretty disgusted and had to soothe myself with a Starbucks.  See, Home Depot cost me 4 bucks and I didn't even buy anything there!  Well, my coffee habit is neither here nor there.  I'm mighty happy with the way the window shaped up. 
The fabric is from Joann's Home Decor section.  I can't find it online, so I don't have the link.  Again, here is the link to the shade I purchased. I think I should be getting a little kickback from Overstock at this point, don't you?

Wednesday, February 17, 2010

A sticky and stanky makeover

Since I have a shopping addiction, I have tried very hard to keep my spending in check for our art room redo.  It wasn't too hard since this room could only hold one piece of furniture...but I didn't even want to pay for the piece we needed, which was a large desk or table.  I found a perfect (almost free) solution when I looked into this little-used room on our first floor.  We call it the 'office,' but do not do any sort of office work in there.  In fact, the only ones who work in there are the cats.  They work on beating their records for smelliest turds.  Honestly, there is no good solution for cat poo, is there?
I will go into more detail about this room later, it definitely needs it's own full post because it was riddled with homeowner drama!  But back to the main story...I decided to steal the IKEA laminate desk for the art room, since it was just a place to pile up mail and other garbage, anyway.  Here she is after the 'hutch' and glass top were removed:
NOT CUTE.  While the light wood-look was hot when I purchased the office set 7 years ago, it is definitely not anymore.  So, I decided to paint it high-gloss white.  I took it apart and brought it downstairs to my 'kill room'...where I spray paint things with Dexter.
And then I finally took off the IKEA sticker.  Because I probably won't return it now.
I gave everything a good sanding.  Well, as good as you can sand without removing any of the dowels or Ikea hardware.  Yeah, sometimes I'm LAZY. 
I sanded the laminate until I had pretty impressive piles of dust all around the pieces.  Then I sprayed everything with a great oil-based primer, Cover Stain. 
I usually roll or brush on BIN primer for wood/laminate, but I saw a fantastic deal on Cover Stain cans at my local BM store, so I picked that up instead.  It works well and I'm LAZY.  Plus, I have a kill room.  Duh!  The choice is obvious.   
I sanded any rough spots after the primer dried, and then busted out the sticky, messy and stanky Rustoleum Oil-Based enamel in Gloss White.  I knew oil-based would work better on laminate than water-based, and I wanted a nice candy-shell finish on the desk, but OH MOTHER it is such a pain.  On the plus side, you get a little 'high' from it.  So that's cool.    
I'm kidding.  Sort of.  Whatever you do, do NOT apply this paint with a nap roller!  I had little fuzzies everywhere, for some reason dust, dirt, hair, boogers, anything in the air is attracted to this paint like a magnet.  And it takes 24 hours to dry.  Booooo!
I sanded the first coat of paint to get off all the little fuzzies, then wisely decided to give the nappy roller another shot.  I am dumb.  Needless to say, the same thing happened and I just don't care anymore.  It will remain fuzzy.  And you can totally see it. 
At least the top has glass, so that helps a little.  Fuzzies or not, it is much improved, and definitely serves it's purpose for the room.  Side note: there is another part of the desk that I also painted, but used a foam roller instead of nap.  It worked oodles better.
It looks so much better white!  And it only cost me about $13 in paint and primer.
And because I'm not quite done putting everything together, here are some teasers of the other components of the room:
I will have it all posted by Friday!  In the meantime, happy Hump Day!

Monday, February 15, 2010

Ode to Overstock

Overstock.com, how do I love thee? Let me count the ways:

1. Your website is well organized, and the online reviews mean that I always know what I'm getting.
2. Your amazing prices make my heart flutter!
3. 'Club O' membership allows me to get an extra 5% off plus free shipping with every order, which almost puts me into cardiac arrest from the excitement!
4. The coupon page on your site ensures that customers practically never have to pay full price, even if they are not a member.  What company does that? 
5. The speed at which my items ship leaves me flushed with happiness.  Like this Saturday when I ordered a rug for my art room at 11am, and it shipped at 1am Sunday! Who ships things in the middle of the night on a Sunday?  You do!
6.  The quality of your items has the ability to inspire love letters....and I can't wait to get my (8' square) jute rug on Wednesday!
Love,
Sara

ps - I will post the reveal of the art room after the rug arrives this week.  We love the way it turned out!

Thursday, February 11, 2010

Art room floor

While we had an empty room to work with, I thought it prudent to address the floor.  The wood floor in this room is pretty rough.  It's got water damage, visible nails and has lost much of it's finish over the years. 
We are planning to refinish all the upstairs floors soon, so I just wanted to make it look a little nicer until then.  I had picked up some Bona Hardwood Floor Refresher awhile back, and decided to give it a try.  First, I gave the floors a good cleaning with my go-to product, Bona Hardwood Floor Cleaner:
Then I let them dry, and busted out my secret weapon:
It is supposed to put a very thin layer of urethane back on the floor, smooth out scratches, and give more sheen.  You are supposed to use this special pad to apply it...
 ...but I think you could use a t-shirt wrapped around a regular mop.  I'm all about savings!  I rocked the bottle gently to mix, then followed the directions, making large S-patterns on the floor and mopping with the grain.
 
I made sure to coat the bad area by the door really well:
When I was done with the room, it was looking mighty nice!
Of course, it didn't dry that way.  After two coats, it looked like this:
Uh huh.  Your eyes aren't going, there really is no discernable difference.  Maybe side by side will help to see it?
Not really.  Apparently, this stuff only works when there is actually poly already on the floor.  Well, I'll be darned.  The areas of the room that still had some finish did shine up a bit.  The rest, well it just looks clean.  

Even though I wasn't blown away by the results, I will definitely be trying this product on our floor in the living room and front hall, there are tons of scratches there already, and I'm interested to see how it does on floors with a nice newish coat of poly.  Refresher aside, the Bona cleaner is the ultimate.  Professionals recommend it, and it won't damage your finish or make your floors dull like Orange Glo can over time.  I highly recommend it!  I buy the Bona products at Bed Bath and Beyond, and the bonus is that you can use those 20% off coupons they litter your mailbox with on a weekly basis! 

Cost
Refresher - with coupon, $15
Cleaner - with coupon, $16 for a gallon container (we refill our spray bottle)
Mops/pads - I'm really not sure anymore.  Probably $20 for two pads and the mop itself.