Tuesday, January 22, 2019

KonMari-ing our closets

So.  Organization is pretty much on everyone's mind in January, but especially this year with 'Tidying Up' streaming on Netflix.  We watched the first couple episodes, and like many people, it resonated with us in a big way!  Shaun is not one to go through his clothes very often, he had sweaters and jeans in the closet that he hasn't worn in ten years.  That means these clothes were moved to Minnesota and to Illinois without us ever addressing the issue.  He actually got rid of two huge black garbage bags of clothes that didn't "spark joy," but it is much harder for me to get rid of things.  Here's what I was looking at on a daily basis:
Disaster!  There was constantly stuff on the floor, piled on my nightstand, and everywhere else I could throw something.   I realized that the 'bookshelf' solution that worked well for clothing storage in my dressing room years ago was not that effective inside a tiny closet.  Also, please hold while I go cry into my glass of wine and look at photos of my beloved dressing room. 
 I also had this 'bin of shame' that just held a huge pile of stuff that I didn't use often (cough cough *workout clothes*) and was always such an eyesore. 
 Here's a better look at that pile once I removed all the random bags from the floor:
The floor was always like this because things would fall off the bookshelf and I was too lazy to put it back.  Also, slippers.  Such a problem, you damn sippers!
I knew I needed to go through the clothing and KonMari that crap, but I also realized I needed better storage in here.  I decided to go with white mesh Elfa 'dressers' from The Container Store, and it has worked out really well in this small closet!  The best part is that January is their annual Elfa sale, so I got 30% off.  (Spoiler alert, it's still expensive!)
When things are piled on shelves, it usually makes a mess when you try to remove something from the bottom of the stack, so drawers were much better for things like tank tops, t shirts and pants.  Assembling the Elfa stuff wasn't exactly fun, but it was easy enough.  You have to hit the pieces together VERY hard, so be sure to protect your floors really well when putting together.  I opted for the driftwood melamine tops instead of white, clear feet and the clear drawer clips that ensure you can't pull the drawers all the way out onto the floor.  Here is the final product!
This closet is 48 inches wide INSIDE, but the space between the open doors is just 37 inches.  Whatever drawer units I picked had to fit inside that width so I could slide the drawers out without hitting the closet doors.  I ended up choosing the tall (10 runner) narrow (14") frame for the left, and a short (4 runner) wide (22") frame for the right.  Together they are 36 inches wide, perfect for this space. 
Once you pick your frames, you just buy the drawers you want, the top you want, and put it all together.  The units are clipped together in the front and back, so they won't slide around.  I love how much easier it is to get to my things!  I can also push back the teal bin (which holds my bras - ha!) and make enough room for emergency folded clothes that need to be put away if I'm short on time. 
I tried my best to do Marie K's folding technique, but ended up pretty much just rolling everything in the smallest drawers.  I love that everything is one layer deep now, no wondering what I have.  I can also pull the drawer all the way out without it falling, to see the back. 
Some other things I added to increase the functionality are Container Store shelf dividers for the existing wire shelving that came with the house.  I was so happy they fit perfectly!  I need one more for in between the last two stacks of sweaters. 
I also purchased this clear plastic ventilated shelf liner from Container Store, they sell it in 12, 16, and 20 inch depth to fit standard wire shelving.  I had to cut little boxes out to allow the shelf dividers to pass through, but the bonus is that the shelf dividers hold the liner on with no sliding around.  No more snagging my sweaters!
I've had these hooks sitting in my laundry room unused for years, finally got around to installing them in here for jewelry and robe storage.  Thanks, Youngsters! 
I love how these look, and I didn't mess with anchors.  Just drilled a small hole in the drywall and screwed them in.  
A few more little things I added are Elfa hooks behind the hanging clothes to store belts:
 And purses:
I also have a couple handbags on the lower drawer unit top, and it's a great place to store boots and shoes so they aren't on the ground. 
 I also have enough room on the right side to store tall boots, which is nice.
All of my jeans and leggings fit in the short unit, and all my everyday tops and sweaters fit in the closet somewhere.  I got rid of several bags of clothes, so I'm feeling pretty good.  Now, I just need to work on getting rid of my 'overflow' clothes in the other rooms.  That is mostly dressy stuff, and things I am not sure I will ever wear again, but find it hard to get rid of.  I'm especially impressed with Shaun's closet makeover, his side is pretty bare compared to before!
 Our closets are looking so much better. 
What you didn't see, the bed immediately after this project.  Ha! 
A little before and after:
I'm so happy with the functionality of my closet now, I'd highly recommend the Elfa storage line if you are looking for help with closets, cabinets, or any space in your home!  Just to be clear, everything in this post was purchased by me at retail price.  As always, this blog is for fun and I do not accept sponsored posts or free products in exchange for reviews.

Thursday, November 8, 2018

Our big summer project - three months later

We usually have a big outdoor project every year, and this year we chose to put in a big, beautiful shed.  We have limited storage in our garage, so a shed is absolutely necessary.  Here she is newly put up.
We chose to use Tuff Shed because of the 6 inch galvanized steel joists that make it able to sit right on the grass without the expense of a slab underneath.  Unfortunately, Tuff Shed requires a permit to install their sheds, and that meant I had to deal with the village - which sucked.  We have a huge 10ft utility easement on the back property line, and it has to be 5 ft from the side lot line, which meant the shed had to be basically in the middle of our yard.
I didn't want to put it in the easement, because it cost 4k and if they needed to remove it to work on the utilities, we were out of luck.  I agonized over the placement of our 8x12 shed.  Originally, I thought we could put it lengthwise against the side lot line facing our tree...then I realized our side lot line is actually only 10 feet from our house - see orange cup on the stake.  This is in between our houses, with ours being on the right side of the pic.  I guess we've been mowing our neighbor's grass for three years!
With this narrow side yard, the tree trunk would be only 7 or 8 feet from the shed door if we put it along the side line.  No thanks!  We ended up turning it to face front, and landscaped to make it seem intentional that it was so far into the yard.  Spoiler alert - the inspector didn't even measure anything, so all my careful measuring and worry was for nothing!  I was livid!
It was pretty fascinating to watch the installation process.  It was a man and woman, and they had it done in about 6 hours if I remember correctly.  We ran into an issue where I didn't call the diggers hotline before the install date, the Tuff Shed receptionist who scheduled me didn't tell me I needed to, and the village of Palatine requires three foot deep anchors to be attached to all four corners of the shed  You know, in case the all-wood and metal 1 ton building blows away in the wind.  It was quite an ordeal getting them to come back to put in the anchors that we paid for, so that tarnished my experience.  But, they did get in about a week later so we could get inspected and start landscaping.
This shed is absolutely wonderful.  It looks beautiful, it has windows that slide open, and we opted for the built in shelving on the back wall.  Zach loved the shelving until we got it all crapped up!
I upgraded to black hardware, and I'm so glad I did.  We would love to one day get electric run to the shed, and I would probably add two small black 'porch' lights somewhere on the front.  
I love how it looks from the street!  Just like a mini version of our house, minus the brick.  
Once it was up, I bought some foundation plants and came up with a plan to make this thing look less dropped in from nowhere.  
I changed my mind so many times with the landscaping plan!  I realized after we got it installed, that the extra big door can swing all the way back to the window, so we'd have to plant low things where the door swings.  I probably could've gotten two smaller doors that meet in the middle, but we are just working with it.  
I always like when things are new and clean, so I took a formal photo with the shed before all the landscaping, complete with yellow string to help mark it out.  I never get in the photos, so I'm glad I did!
While I loved the clean look of the inside for the first week or two, we had to spoil it all with our junk  We needed tall shovel and rake storage, and lots of heavy duty hooks for our bikes and yard tools.  
We got everything we needed at Home Depot, including the customizable tool rack and pegboard panels.  Warning, I did not tidy up for these photos.  This is my life!
And the other side, minus our bikes which are usually hanging from those ceiling hooks:  
And the lovely view straight on:
Things on the outside started to take shape after I decided to use five grasses along the side lot line to act as sort of a privacy screen.  We had to cut out a lot of grass all around the shed, and the right side had to be extra long.  
I always prefer a curvy planting area, and I worked with the existing circle around the maple tree to make this one big mulched area. 

Zach liked to help with the grass removal, and he found a bunch of cicada shells, so that was a little boy WIN!
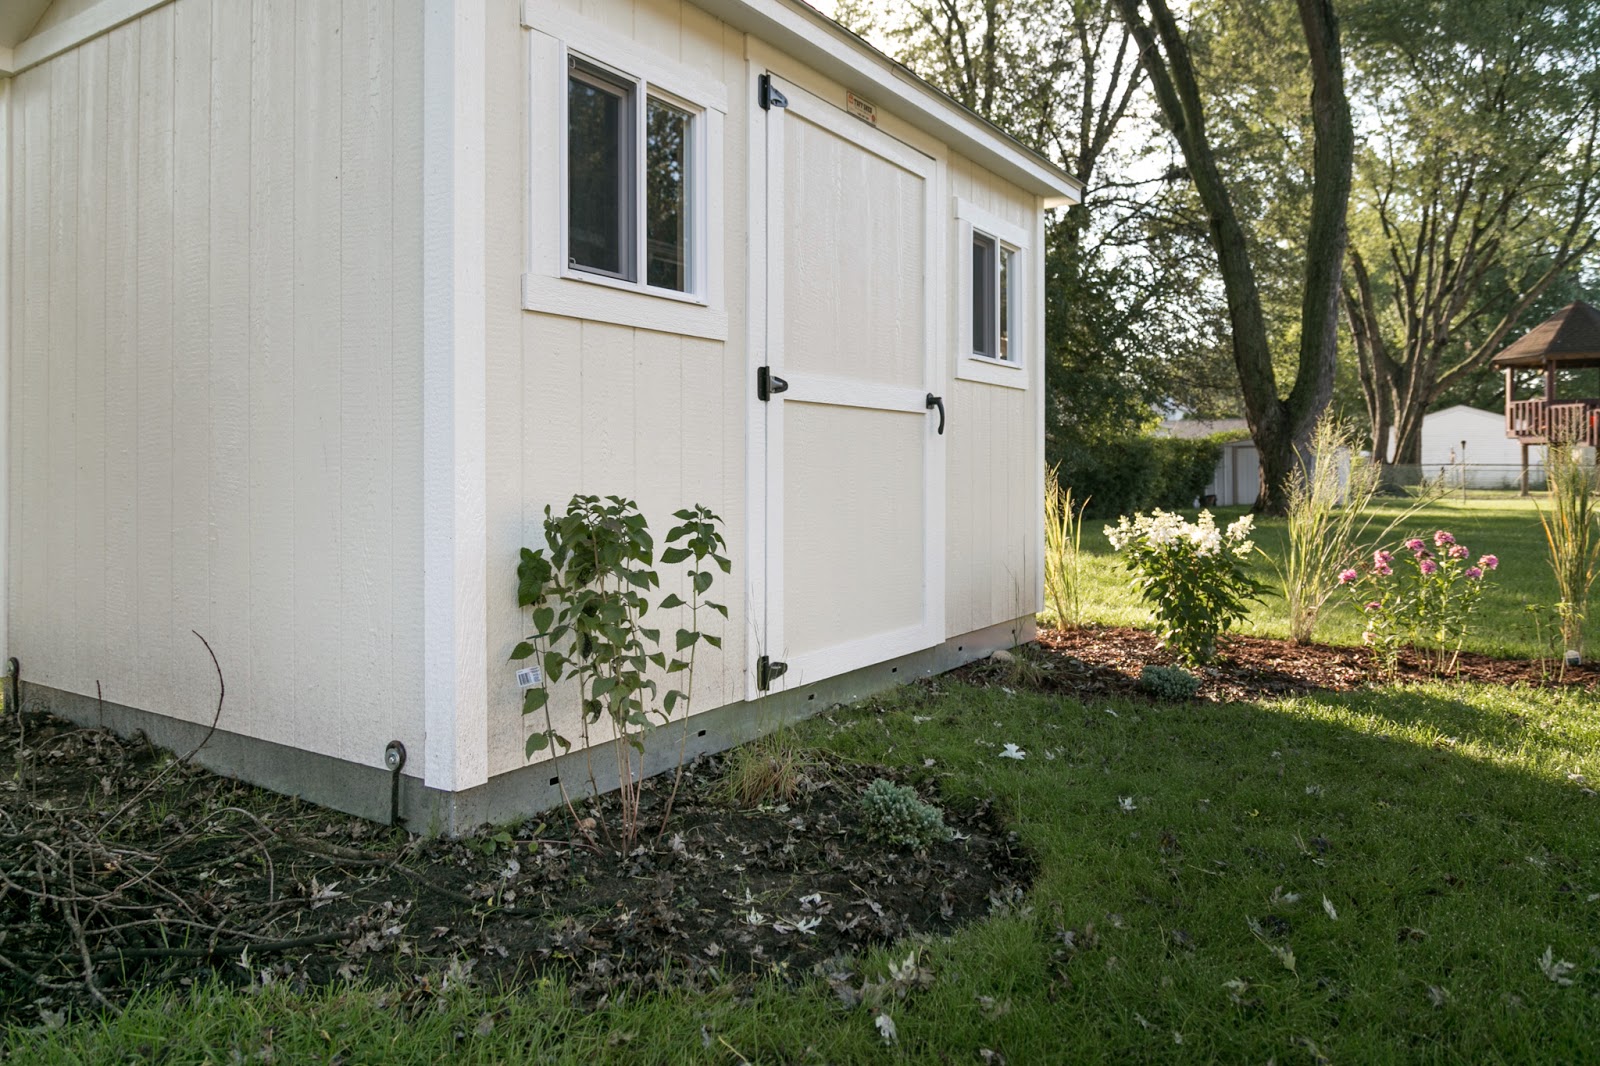
Once we got it all in, it was looking so much more natural.  On the right is a Pinky Winky hydrangea, 3 pink phlox moved from another spot in the yard, 5 Northwind switch grasses, a blue star juniper, and native little bluestem grass by the door.  
The left side has another little bluestem, another blue star juniper, a golden barberry, and tall bee balm.  Though, it seems I planted the barberry after this photo was taken!
The grasses along the side should get nice and big, about 2.5 feet around.  I can't wait to see what that looks like!  I also planted tall Joe Pye Weed on either side of the window, they get about 6 feet tall, so it should be a beautiful sight in late summer.
Now, we are into November, and here is what the shed is looking like now:

I love how everything looks like it was always there.  We plan to put some tall evergreens behind the shed to block the unfortunate view of our neighbor's unmowed yard and satellite dish.  I also appreciate how the foliage of my plants are changing with the season.  I need to pay more attention to selecting plants with fall color, rather than putting nothing but beautiful summer flowers in!
This little barberry in the front of our house makes me so happy!  I plan to put in more shrubs that have that beautiful fall color next year. 
One other thing I did this summer was overhaul the planting area in the back corner of our yard.  I'll share that project in a different post!  One last view of the shed from our back door:
So happy to have it installed!

Wednesday, July 18, 2018

Landscaping update

I'm pretty sure I start each summer with the same post (I know it's mid-July, sorry!), it goes something like 'once the garden centers open for the season, I feel the itch to landscape!' This year was no exception.  We had a few things die over the winter and cold spring (my roses, a maiden grass, a tall daisy) but other than that, things are looking good.  We got our annual pile of triple ground mulch from the Mulch Center, it's so damn beautiful when it first gets dropped off.
The kids 'helped' me spread it around, it was worth the mess to see them covered in mulch and laughing.
I love the look of new mulch! 
I wanted to spruce up a couple areas I thought were lacking, so I searched for a planter that would fit this weird ledge near our garage.  I found the perfect one on Wayfair, it is like it was made for this spot. 
I planted some annual grasses in there.  The planter is lined with styrofoam too, so they will stay alive longer in the fall. 
Another new addition to this area is the little Ikea table and chair set that we bought in Minnesota.  We found it in the garage, and decided to just set it up on the drive as a makeshift patio while the kids ride and play on the sidewalk.  We don't park in the left side, so this works for us - and I think it looks cute!
 Rules, there are no rules here!
I also wanted to add a planter in the back by our deck.  Found this modern concrete-look composite one at Home Depot, love it!  I'm considering adding a couple more along the deck, electrical is buried there, so we can't plant in the ground. 
You might notice a hot mess to the right of this planter.  Yeah, that is a dumb ass project that I'm not sure what I was thinking when I did it.  We basically had a mud pit at the bottom of the deck, it made a huge mess on the wood and got walked into our house. 
We thought it would be cost-efficient to just remove the grass and some soil, and put in a little patch of paver base as a 'patio' until we did an actual patio.  I got to work on this silly plan. 
It went surprisingly fast, I got all this done in a few hours.  I planted some Stepables plants on the sides, but it turns out that paver base is very painful to walk on.  Duh! 
We made it work with an old door mat until I picked up some (but not enough) rubber pavers for the top at Menards.  It looks awful, that's for sure!  We intend to add a large paver patio next year, so this will hold us over until then. 
Other additions to the yard include a sweet raised garden bed that we made out of cedar.  I can't wait to share how we did it, it's been amazing to have endless amounts of cucumbers, and our corn is so majestic! 
We got a random apple tree from a friend who saw it posted for free online.  We aren't sure what kind it is, but we think it is an upright variety because of how the branches are pointed up.  We will see what happens!
So, things are doing well around the house and we've been lovingly watering the crap out of everything since we haven't had any significant rain for a long time.  Here are some yard shots, it's pretty fun to see how things are filling out. 
A close up of this year's planter in the front...I like it, but it's a little high maintenance and you can't see the Cordeline in the back anymore.  One day I'll get it perfect!
We found a new hibiscus that we couldn't pass up this year, so there will be another large plant taking up room in our house this winter.  Ugh, I just can't help myself!
We have a fun project happening soon, hopefully I can share it before another two months goes by!  Happy July!